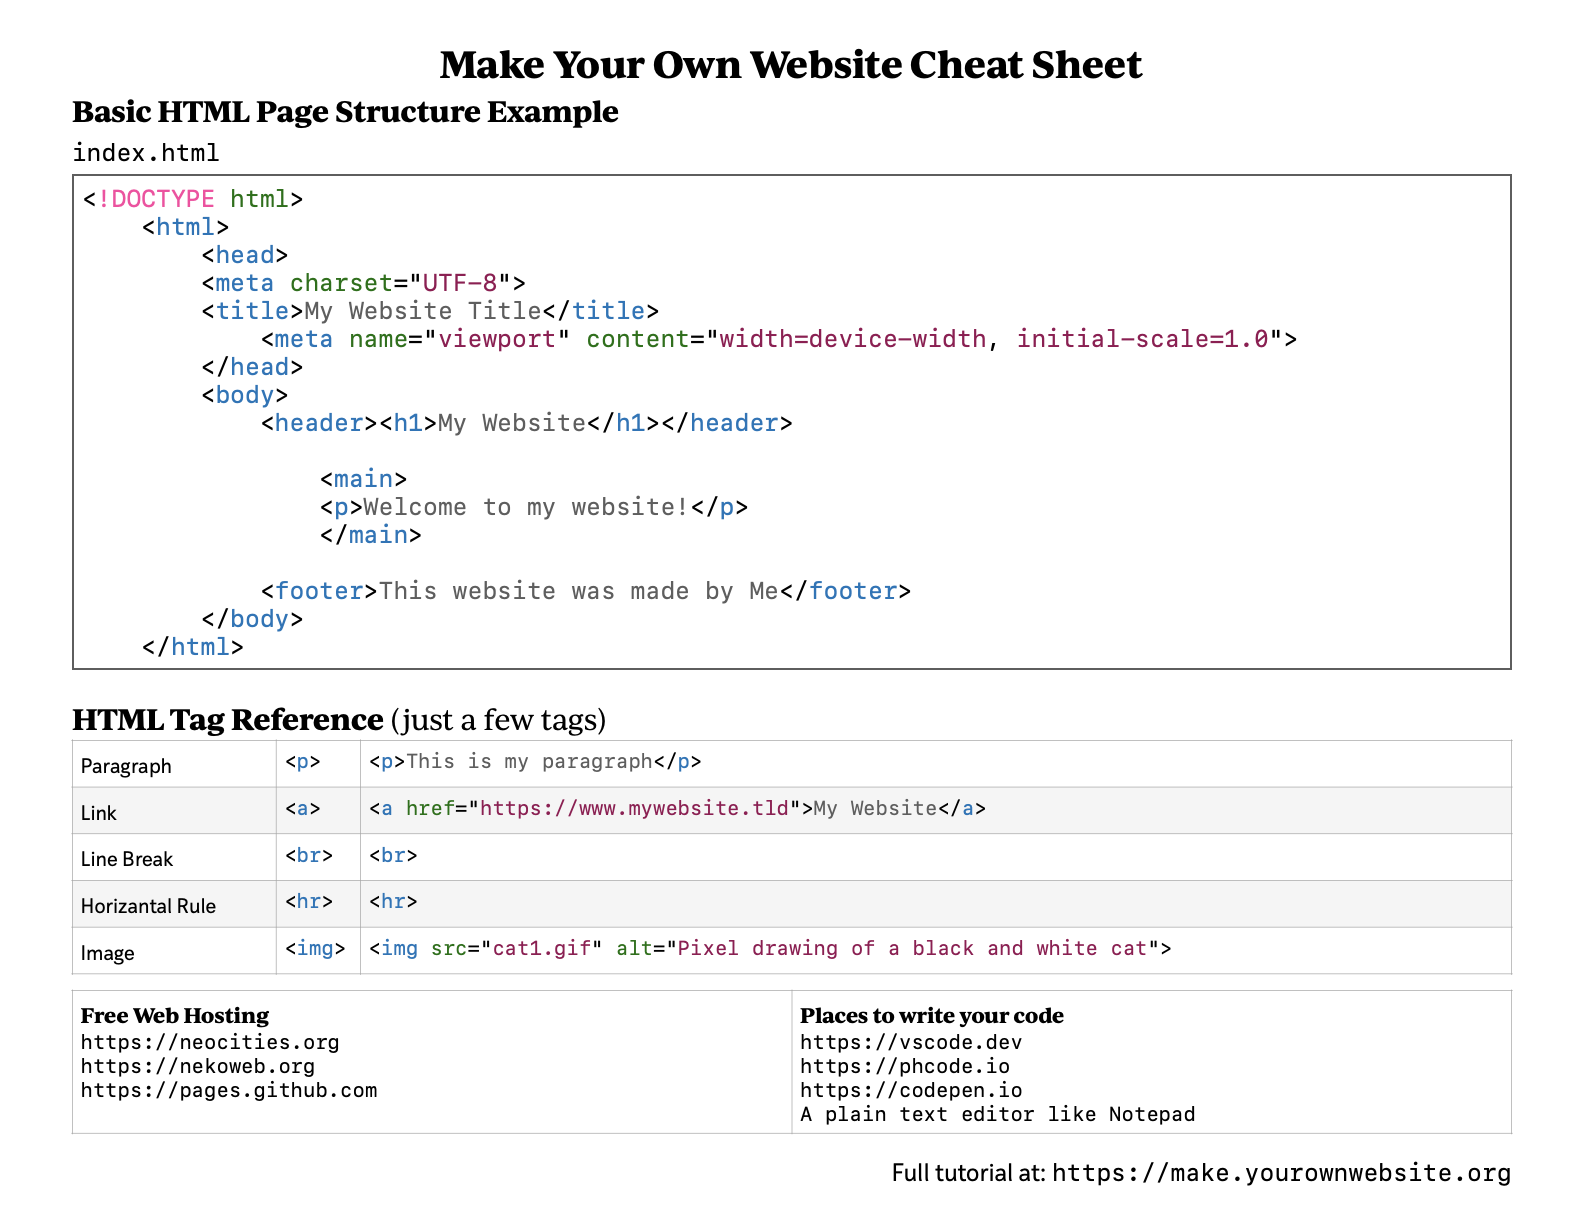
Getting Started
This is not a complete HTML/CSS tutorial, but will attempt to guide you through making your first page using HTML and CSS.
Software
You will need a plain text or code editor. I use Visual Studio Code(it also has a web-based version). Another option is Phoenix Code(also has a desktop and web version). You can also use a plain text editor like Notepad or TextEdit.
Make a Folder
On your computer, create a folder that you will put all the files for this website into. I like to have a "Websites" folder with subfolders for each of my different sites. You can name the folder whatever you want, like "homepage" or "cats".
Open the folder in your code editor, or open your text editor. Create a new file(or save your text document) and name it index.html
Why is the file named "index.html"?
In websites, the "index" page is the default page that will be shown if someone browses to the root of a website address or folder, so whatever you want people to see first should be called "index". If you want to make a page with an address like shannonkay.com/books without having to see a "page.html" file name, you need to make an "index" page inside the "books" folder. Our file has a .html ending because we're putting html code in it.
HTML Page Structure
Most HTML tags have an opening and a closing tag. The first one we need is the <html>
tag. All the rest of our HTML will go between these opening and closing tags.
<html>
</html>
There's one more thing we need to put before our opening <html>
tag, and it's the !DOCTYPE
declaration. It tells the browser what type of document to expect. This is the !DOCTYPE declaration for HTML 5.
<!DOCTYPE html>
<html>
</html>
After the <html>
tag, there are two important tags that further divide our HTML document, <head>
and <body>
. The <head>
tag contains important information that doesn't show on the page. The <body>
tag contains all the content of the page.
<!DOCTYPE html>
<html>
<head></head>
<body></body>
</html>
In the head section, we will put the <title>
tag. The title that goes in this tag will not show up on the page, but it will show up in the browser tab and be the title for bookmarks, sharing, etc. Don't add any other HTML tags in the title.
<!DOCTYPE html>
<html>
<head>
<title>I Love Cats</title>
</head>
<body></body>
</html>
For now, we'll just add one more thing to the head section. In these modern times, people view websites on a wide variety of device sizes, including smart phones. The viewport <meta> tag
will help it resize properly on those devices.
<!DOCTYPE html>
<html>
<head>
<title>I Love Cats</title>
<meta name="viewport" content="width=device-width, initial-scale=1.0">
</head>
<body></body>
</html>
Page Content in HTML
Let's start adding content to the body section of the page with a header. We'll start with a semantic <header>
tag, and our page title will go inside it. I'm going to use the same text as my title for this page, I Love Cats. Put the header text between <h1>
tags. The <h1>
tag means that this is the top-level header, usually what's at the very top of the page.
<!DOCTYPE html>
<html>
<head>
<title>I Love Cats</title>
<meta name="viewport" content="width=device-width, initial-scale=1.0">
</head>
<body>
<header><h1>I Love Cats</h1></header>
</body>
</html>
Let's use another semantic tag, <main>
, and put whatever we want to be the main content of this page. I'm going to use <h2>
for a header that's smaller than and "below" the <h1>
at the top of the page, and I'll use the <p>
(paragraph) tag for my text.
<body>
<header><h1>I Love Cats</h1></header>
<main>
<h2>Favorite Cats</h2>
<p>I love tabby cats, bengal cats, and siamese cats!</p>
</main>
</body>
We can also add a <footer>
for some extra information at the bottom of the page, like telling everyone who made this website.
<body>
<header><h1>I Love Cats</h1></header>
<main>
<h2>Favorite Cats</h2>
<p>I love tabby cats, bengal cats, and siamese cats!</p>
</main>
<footer>This website was made by Shannon</footer>
</body>
Sections
Let's make some sections to divide our page's content. We'll keep our sections within the main tags, and remember that everything that will be shown on your page should stay within the body tags.
I'll make the My Favorite Cats header and paragraph my first section by putting <section>
tags around it.
<main>
<section>
<h2>Favorite Cats</h2>
<p>I love tabby cats, bengal cats, and siamese cats!</p>
</section>
</main>
Let's add more sections. You can make as many sections as you want.
<main>
<section>
<h2>Favorite Cats</h2>
<p>I love tabby cats, bengal cats, and siamese cats!</p>
</section>
<section>
<h2>Tabby Cats</h2>
<p>Tabby cats have a striped pattern and are usually brown or grey.</p>
</section>
<section>
<h2>Great Names for Cats</h2>
<p>Some people like to name their cats with names like
Fluffy, Frisky, or Patches.</p>
</section>
</main>
Linking
Linking pages and websites together is what makes the internet a network. The HTML for creating links is an <a>
(anchor) tag with an attribute called href
.
Writing a link in HTML looks like this.
<a href="about.html">About</a>
The a tag has an opening and closing, just like the other tags we've been using. The text between the tags is what will show on the page for users to click(or tap) to follow the link. In this example, I'm linking to a file called "about.html" and my link's text will say "About". The file needs to be in the same folder as the page I'm putting the link on for it to work with just the file name like this. If the file is in a subfolder, include the path like this.
<a href="about/index.html">About</a>
And when you're linking to different website, be sure to include the full url like this.
<a href="https://web.pixelshannon.com">Make Your Own Website</a>
Images
To embed images in your page, use the <img>
tag. Put the filename of your image in the src attribute. I put my cat pixel images in a subfolder called "cats", so I included that path just like with the links. Many people like to have a subfolder for all of their images, named something like "img" or "images".
<img src="cats/cat1.gif" />
For accessibility, you should always add alt text to your images. This helps people who use screen readers. To do this, put the alt attribute in your <img>
tag. Write a short description of the image. Even a word or two will help!
<img src="cats/cat1.gif" alt="Pixel drawing of a black and white cat" />
Create a Stylesheet With CSS
Now you have a basic HTML page that you can open and view in the browser. If you open your index.html file, it will look very plain. The CSS used for a website is called the stylesheet.
CSS looks like this. The selector describes what in the HTML is being selected to be styled.
selector {
property: value;
}
Create a new file called style.css and save it in the same folder as your index file. Unlike the index HTML file, you can name the CSS file for your stylesheet anything you want.
Let's start simply by adding a background color. I'm using hexadecimal color values. There are some named colors that you can use, but unless it's white or black, I find it's easier to get the color you want with a color's hex code. I'm using a light pink for the background, #f9dee1.
The selector is "body" because we're selecting the <body>
tag in our HTML. Remember how everything visible on the page goes inside the <body>
tags? That means that styles applied to "body
" in our CSS will affect the whole page.
body {
background-color: #f9dee1;
}
Link Your Stylesheet
Now that you've begun a stylesheet, add it to your HTML page to see the CSS applied to the page.
Back at the index page, CSS goes within the <head>
element, like the <title>
does. We're going to link to the stylesheet like this.
<head>
<title>I Love Cats</title>
<meta name="viewport" content="width=device-width, initial-scale=1.0">
<link rel="stylesheet" href="style.css">
</head>
You could also put your CSS directly on the page, and it would still go within the <head>
tags, and between <style>
tags, like this.
<head>
<title>I Love Cats</title>
<style>
body {
background-color: #f9dee1;
}
</style>
</head>
Using an external stylesheet, like the one we linked in our header is usually preferred. It's more flexible, and you can link to the same stylesheet on multiple pages so you don't have to make changes multiple times.
Stylish Bonus
In case someone views your website on a mobile device, you can set a background color for the top of the screen to match your website's background color. It's not CSS, and you would have to change it in every page if you change your background color, but it's a nice detail that I like to add.
All you need to do this is a <meta>
tag with the theme-color
attribute. Put this in the <head>
section of your page. Add your color in the content
attribute. I chose the same color I used for the <body>
background color.
<head>
<title>I Love Cats</title>
<meta name="viewport" content="width=device-width, initial-scale=1.0">
<meta name="theme-color" content="#f9dee1">
<link rel="stylesheet" href="style.css">
</head>
More Style
Let's go back to the stylesheet to add more style to our page. I've added to the style for body
with the font-family
and color
properties. This will change the font and color of the text.
I've styled centered the header by styling h1
with text-align: center
and added color
to h1
and h2
.
I've also added rules to the footer
, centering the text with text-align
, adding a border
to the top of the footer with border-top
, and adding padding
.
body {
background-color: #f9dee1;
font-family: Verdana, Geneva, Tahoma, sans-serif;
color: #282A36;
}
h1 {
color: #FF1493;
text-align: center;
}
h2 {
color: #FF69B4;
}
footer {
text-align: center;
border-top: 2pt solid #fcc9ce;
padding: 5pt;
}
CSS is very extensive, and this is barely scratching the surface of what you can do. Check out a full CSS tutorial when you're ready to do more. You can also check out the stylesheet for this page.
More Pages
You might want your website to have more than one page. Linking your pages together from the index page creates a multipage website.
Now that you know the basics that every web page needs, you can make additional pages. Create a new html file and use your index page as a template for any other pages you want to make. You'll want to change the title and header, and most likely put most of the new page's content within the <main>
tags. Additional pages can be named whatever you want, but the files should have a .html
ending and have no spaces in the name.
<!DOCTYPE html>
<html>
<head>
<title>I Love Cats</title>
<meta name="viewport" content="width=device-width, initial-scale=1.0">
<meta name="theme-color" content="#f9dee1">
<link rel="stylesheet" href="style.css">
</head>
<body>
<header><h1>I Love Cats</h1></header>
<main>
</main>
<footer>This website was made by Shannon</footer>
</body>
</html>
Lists
Creating a list in HTML can be very useful. use <ol>
for an ordered list(usually a numbered list) or <ul>
for an unordered list. Each item in your list should be wrapped in <li>
tags, for "list item".
<section>
<h2>Great Names for Cats</h2>
<ul>
<li>Fluffy</li>
<li>Frisky</li>
<li>Patches</li>
</ul>
</section>
IDs and Classes
Adding classes and IDs to the HTML can help us to create more specific styles, and organize the page more.
Use an id
attribute when there's only one on the page, and a class
attribute when you might use it multiple times. You can also link to an ID to create a link to a different page section. You can put the ID in pretty much any tag, but the h2/h3 tag of a header, or the section tag are the most common.
Here's an example
<section class="box">
<h2 id="tabbycats">Tabby Cats</h2>
<p>Tabby cats have a striped pattern and are usually brown or grey.</p>
</section>
Link to an ID on the same page like this
<a href="#tabbycats">Tabby Cats</a>
Styling Boxes and Borders
To style my sections, I can use CSS to select all <section>
tags, or I can use a class or ID. Since I added the class "box" to all of my sections in the middle, I can use the class selector to style only the sections with the "box" class.
I can do things like add a border, a different background color, font color, font sizes, etc.
.box {
border-style: solid;
border-color: white;
border-width: 1pt;
}
This will apply the style to all elements with the class "box". I can also select only <section>
elements with the class "box" using element.class
like this.
section.box {
border: solid white 2pt;
padding: 5pt;
margin-bottom: 5pt;
}
There are several options to choose from with border-style
, including dotted, dashed, and double.
You can make a rounded border with the border-radius
property.
section.box {
border-radius: 10%;
}
You can select an ID as well, using an ID selector like #id
#tabbycats {
color: #c095e4;
}
In this example, the <h2>
with the id attribute tabbycats
will be styled with a different text color.
Photos
I exported my photo with a max-width of 1024px from my photo manager and put it in a subfolder named "photos". The <img>
code is the same as before, with a different source and alt text, and I've added a class called photo
<img src="photos/kittenbaby.jpg" alt="A grey and white cat" class="photo" />
Now I can style my photo, and any other photos that I give the photo
class to, in my stylesheet. I'm giving it a white border, resizing it, and giving it slightly rounded corners.
.photo {
border: solid white 2pt;
width: 400px;
max-width: 100%;
height: auto;
border-radius: 10px;
}
You might want to link to the full sized photo, using the resized embedded photo as a thumbnail. The HTML for this is just like a regular link, but instead of text for the reader to click on, the <img>
code goes there.
<a href="photos/kittenbaby.jpg"><img src="photos/kittenbaby.jpg"
alt="A grey and white cat" class="photo" /></a>
If you want to have a photo with a caption attached, you can keep them all together with the <figure>
and <figcaption>
tags. Put your <img>
after the opening <figure>
tag, and write a caption between the <figcaption>
tags.
<figure>
<a href="photos/kittenbaby.jpg"><img src="photos/kittenbaby.jpg"
alt="A grey and white cat" class="photo" /></a>
<figcaption>A cat named Kitten Baby.</figcaption>
</figure>
We can style these too, if we want.
figure {
margin: 0;
}
figcaption {
color: #FF69B4;
}
Using Emoji
All special characters used in HTML documents need a special code to show up properly. Every special character is part of the Unicode character set, and that includes emoji. To get the code for your chosen emoji, you can use a website like EmojiGuide.com. I searched "cat" on Emoji Guide, and copied the HTML code, which is this: 🐈
Just pasting that code into the HTML as if it were a word made the emoji appear. You can also style your emoji by wrapping it in a tag such as <span>
and adding a class such as emoji
to it.
<span class="emoji">🐈</span>
Then style the class. I want my emoji to be a little bigger than the rest of my text.
.emoji {
font-size: 2rem;
}
View the example page and the example CSS stylesheet
More Resources
- Getting Started With the Web
- No Web Without Women - A collection of innovations by women in the fields of computer science and technology.
HTML and CSS
- HTML Tutorial at HTML.com
- HTML Tutorial at W3 Schools
- CSS Tutorial at W3 Schools
- CSS Basics at mdn
- Girls Who Code Activities
- CSS Reference - A free visual guide to CSS
- Flexbox Froggy - A game for learning CSS flexbox
- Grid Garden - A game for learning CSS grid layout
- mdn web docs References
Design
- Color Hex - color hex codes
- Color Kit
- Create a Website Wireframe in Google Slides (Girls Who Code)